When it comes to converting on Amazon, your product photography is worth way more than 1,000 words. Product photos are one of the main factors that drive conversions because buyers can actually visualize themselves using the product. Plus, not many of us have time to read an entire product listing, especially when we are shopping on the go.
To help you get your product listings fully optimized, we are going to outline Amazon’s 2019 product image guidelines and give you a few tips to catch a buyer’s eye.
Amazon 2019 Image Guidelines
Your product will never succeed if you don’t play by Amazon’s rules when it comes to product photography. These photos are the classic shots of your product on a white background. While they might seem simple, there are actually a few rules.
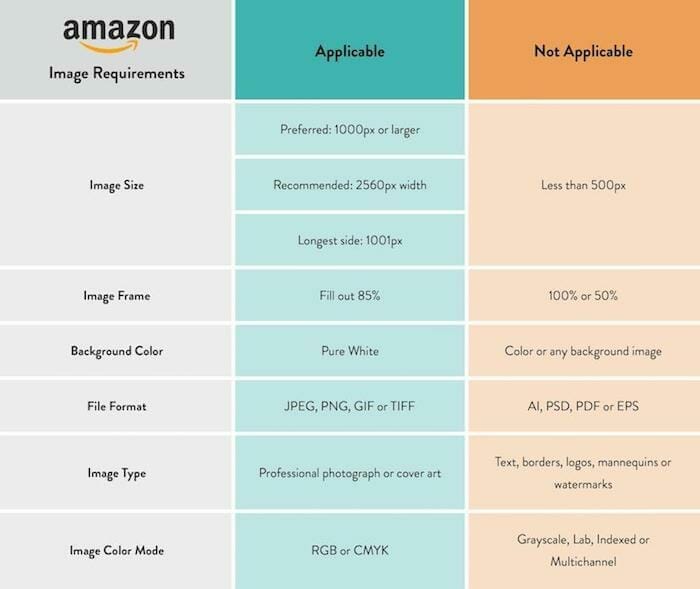
Here are the product image requirements that all Amazon sellers must adhere to:

Image from: Clipping Path India
- Size: All images must be at least 1000 pixels in width OR height. However, Amazon recommends 2560 pixels wide so your images can be zoomable.
- Frame: Your product should take up 85% of the frame. No fluff! Some products — books, music, video/DVD — must take up 100% of the main product image.
- Background: Without exception, all product shots must be on a white background.
- Format: Amazon accepts JPEG, PNG, GIF, or TIFF formats.
- Color: RGB or CMYK color modes are acceptable.
- Design: Product shots cannot include any design elements, including text, logo, watermarks, and other additions.
- Naming: Amazon even looks at your image file names! The file must include your product identifier (ASIN, JAN, EAN, ISBN, or UPC). Then, include a period and the file extension (see Format above). No other characters or naming systems are allowed.
With those guidelines in mind, let’s dive into some tips for beautiful and compelling product photography.
Ultimate Product Photography Tips
1. Use every available image slot
When uploading photos, it’s important to include a number of photos: product shots, lifestyle photos, and even infographics. Amazon allows sellers to include 7 to 9 images per product listing, and we recommend using each slot available.
Try taking close-up images and photographing your product from every angle. Imagine that you are a buyer who’s shopping in a physical store. You see an item, you pick it up, and you inspect it. At what angles are you examining the object? Think like the buyer and replicate angles that they might want to see.
If you are offering a piece of clothing, show someone wearing it from the front, side, and back. You might want to show a close-up of stitching detail or maybe the inside of the garment. If you’re selling snacks, you would want to include a picture of the front and back of the packaging along with shots of the food being eaten.
2. Assign priority
Amazon allows sellers to assign priority to the images they upload. The main product image must be on a white background and adhere to the guidelines above, but after that, images can include graphics, borders, text, and other elements. They also don’t have to have a white background.

We recommend assigning a logical order to your photos. After your main image, include a few product shots with white backgrounds so that your customers can explore your product in a logical manner. Then, prioritize lifestyle shots and infographics to give buyers an idea of what it’s like to own and use your product.
Check out this awesome example that we did for one of our clients!
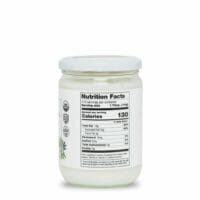
For this example, we included 2 other product shots in addition to the main product image. The first shows a side shot of the nutrition facts. The second is a side shot of the coconut oil information and ingredients.

Next, we included lifestyle photos and infographics to help shoppers visualize what the products would look like in their home and help them learn more about the product. This flow feels natural and intuitive to buyers.

3. Reshoot color variations
It can be a headache to reshoot color variations, especially when you have a lot of color options. However, Amazon demands high-quality and real images. That means you shouldn’t create the color variations digitally.
Because many Amazon shoppers can tell whether or not your photo is a fake, always use high-resolution images. And when it comes to product variations, shoot each color and make sure that those colors are a realistic representation of the product after being shot and color corrected.
4. Watch out for weird cropping
It’s easy to accidentally lose sight of the frame of your picture. Pay attention to each edge of the photo. Trace the edges with your eyes and look for anything that might be unintentionally cut off or cropped. The best photos fill the frame without cutting off the product.
There are times when you will want to crop your photos. For example, if you want to zoom in on a particular detail. Here are some basic photo cropping rules:
- Leave out unnecessary details
- Don’t crop any limbs off at the joint
- Don’t give anyone a bad haircut
- Adhere to the rule of thirds
A great photo can be ruined by odd cropping, so keep your eye on the frame of your photo at all times.
For more tips on product photography, reach out to our team! Our Photography Team has loads of experience making even mundane products shine. We would love to work with you to create compelling product images, along with lifestyle shots and infographics.

About the Author: Alyssa Ball has been working in digital marketing for several years. She graduated from Brigham Young University with her degree in English linguistics and is currently pursuing an MBA. Alyssa’s position as a content writer and keyword strategist at Nozani has allowed her to master both Google and Amazon SEO.

If you’re one of the estimated 20%–40% of brands who fire their agency annually, you can’t focus on that vision if you have to keep searching for the right support. BBE proudly retained >95% of our clients last year while applying focused dedication to our brand partners. If you’re ready to start over for the last time, contact us and find out why leading brands have partnered with us for so long.

